To replace a failed drive, you'll need:
- A Replacement hard drive of the same make and model as the rest of the RAID set
- A small Phillips head screwdriver
- About 10 minutes
Locate the failed drive
Once the system alerts you to a degraded RAID set, it's important that you locate the failed drive properly before taking any further action. Follow the steps below and DO NOT remove any drives until you complete this process.
- Visually inspect the drive bays on your Platform server.
- Be aware that some Platform systems come with a built in "Hot Spare" drive that will begin to take over for a failed drive immediately. When a spare drive is in the "rebuilding" process and is replacing the failed drive, its drive bay will display a BLINKING red light. IMPORTANT: DO NOT REMOVE A DRIVE WITH A BLINKING RED LIGHT OR YOU RISK DATA LOSS.
- Look for the drive bay with a SOLID red light. This is the failed drive.
- Continue to inspect the drive bays and confirm that you have, at maximum, 1 solid red light on a drive bay. If you see more than one solid red light, contact ProMAX support before continuing.
Removing the failed drive
You may remove a failed drive while the server is in operation without issue.
- Locate the drive bay with the solid red light.
- The drive bay consists of a metal faceplate with several holes, and a raised plastic tab on the right side.
- Look closely at the raised plastic tab section. There is a very small vertical "switch" with a lock icon next to it. Insure that this switch is set to "unlock" before moving on. Firm pressure on the switch while moving it up or down should move the switch from lock to unlock.
- Press the entire plastic tab section of the drive bay to the right firmly. The section should move and release the front faceplate of the drive bay, which will swing outward.
- Grab the front faceplate and firmly pull it straight outward. It will swing open to 45 degrees and then lock. Continue pulling the faceplate straight out until the drive sled begins to move out of the drive bay itself.
- Remove the drive sled and attached hard drive from the Platform server.
NOTE: It is OK to leave a drive bay uncovered until the drive is replaced and the sled is reinserted.
Replacing the drive in the sled
If you have a spare drive available of the same make and model of the drives that make up the rest of your RAID set, follow the directions below to install it in the system.
- Use a small Phillips head screwdriver and remove the failed Harddrive from it's drive sled. There are four small screws that secure it on the sides of the sled.
- Insert the spare drive onto the sled and confirm that the drive SATA/SAS connections face the rear of the drive sled. Also confirm that the drive is positioned so the rear of the drive lines up with the rear edge of the drive sled itself.
NOTE: It is possible to inadvertently secure the spare drive in the drive sled in a way that its SATA/SAS connections do not make contact with the server backplane inside the system. Make sure to visually confirm that rear edge of the drive is lined up with the rear edge of the drive sled.
Inserting the spare drive into the system
- Insert the drive sled into the drive bay and slide it forward approximately 2 inches.
- Grip far right side of the the drive sled faceplate with your fingers and firmly side the sled into the bay, allowing the faceplate to snap closed as it seats.
- Confirm that the drive sled is flush in the drive bay compared to the surrounding bays. If it is sticking out, press the plastic tab on the right to release the faceplate and try to insert it again.
- Confirm that the drive sled is secure and does not move freely once inserted.
- After several moments, a blinking red light should appear on the drive bay indicating that a rebuild is in progress. If you do not see a blinking red light within 10 minutes of inserting a spare drive, please contact ProMAX support.
Monitoring the rebuilding process
Once a spare drive is inserted into the system and a rebuild has begun, you can monitor the progress of that rebuild through the Platform Web Interface.
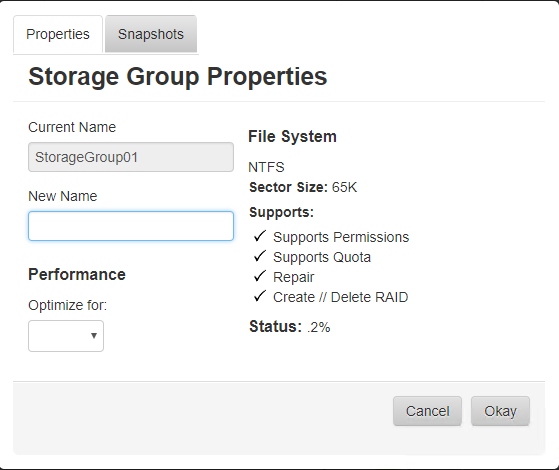
- Log into the Platform Web interface as a user with Admin privileges to the Storage Groups page.
- A rebuilding storage group will show as an orange color. Right click on that the rebuilding storage group.
- Select the "Properties" menu.
- The rebuild status will display as a small line in the bottom right listed as "Status" (See attached image)
Approximate Rebuild Times
Rebuild times vary depending on the size of the Hard drive being rebuilt. Typical approximate harddrive rebuild times are:
- 4TB - 6 hours
- 8TB - 10 hours
- 10TB - 12 hours
- 12TB - 14 hours
- 14TB - 18 hours
Factors that affect rebuild times
Continuing to read and write data to a RAID system that is rebuilding can increase rebuild time significantly. It is recommended that systems in a rebuild state be as lightly used as possible to allow the system to rebuild and data to enter a protected state once again.